In this tutorial, we continue our exploration of the NSFetchedResultsController class by adding the ability to update and delete to-do items. You’ll notice that updating and deleting to-do items is surprisingly easy thanks to the groundwork we laid in the previous tutorial.
Prerequisites
What I cover in this series on Core Data is applicable to iOS 7+ and OS X 10.10+, but the focus will be on iOS. In this series, I will work with Xcode 7.1 and Swift 2.1. If you prefer Objective-C, then I recommend reading my earlier series on the Core Data framework.
1. Updating a Record’s Name
Step 1: Create View Controller
Start by creating a new UIViewController subclass named UpdateToDoViewController. In UpdateToDoViewController.swift, declare an outlet, textField of type UITextField!, and two properties, managedObjectContext of type NSManagedObjectContext! and record of type NSManagedObject!. Add an import statement for the Core Data framework at the top.
import UIKit
import CoreData

class UpdateToDoViewController: UIViewController {

    @IBOutlet weak var textField: UITextField!

    var record: NSManagedObject!
    var managedObjectContext: NSManagedObjectContext!

    ...

}
Next, create two actions, cancel(_:) and save(_:). Their implementations can remain empty for the time being.
// MARK: -
// MARK: Actions
@IBAction func cancel(send: AnyObject) {

}

@IBAction func save(send: AnyObject) {

}
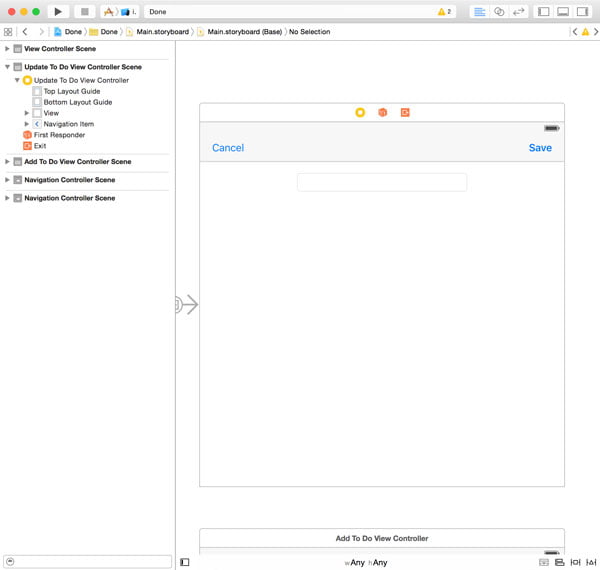
Step 2: Update Storyboard
Open the main storyboard, Main.storyboard, add a new view controller object, and set its class to UpdateToDoViewController in the Identity Inspector. Press Control and drag from the prototype cell in the ViewController instance to the UpdateToDoViewController instance. Select Selection Segue > Show from the menu that appears and, in the Attributes Inspector, set the segue’s identifier to SegueUpdateToDoViewController.
Add a UITextField object to the view of the UpdateToDoViewController object and configure it just like we did with the text field of the AddToDoViewController class. Don’t forget to connect the view controller’s outlet with the text field.
As in the AddToDoViewController class, add two bar button items to the view controller’s navigation bar, set their identities to Cancel and Save respectively, and connect each bar button item to the corresponding action in the Connections Inspector.

Step 3: Passing a Reference
We also need to make a few changes to the ViewController class. Let’s start by updating prepareForSegue(_:sender:), we fetch the record that corresponds with the user’s selection and pass it to the UpdateToDoViewController instance.
// MARK: -
// MARK: Prepare for Segue
override func prepareForSegue(segue: UIStoryboardSegue, sender: AnyObject?) {
    if segue.identifier == "SegueAddToDoViewController" {
        if let navigationController = segue.destinationViewController as? UINavigationController {
            if let viewController = navigationController.topViewController as? AddToDoViewController {
                viewController.managedObjectContext = managedObjectContext
            }
        }

    } else if segue.identifier == "SegueUpdateToDoViewController" {
        if let viewController = segue.destinationViewController as? UpdateToDoViewController {
            if let indexPath = tableView.indexPathForSelectedRow {
                // Fetch Record
                let record = fetchedResultsController.objectAtIndexPath(indexPath) as! NSManagedObject

                // Configure View Controller
                viewController.record = record
                viewController.managedObjectContext = managedObjectContext
            }
        }
    }
}
To finish, we implement the tableView(_:didSelectRowAtIndexPath:) method of the UITableViewDelegate protocol. In this method, we deselect the row the user tapped.
// MARK: -
// MARK: Table View Delegate Methods
func tableView(tableView: UITableView, didSelectRowAtIndexPath indexPath: NSIndexPath) {
    tableView.deselectRowAtIndexPath(indexPath, animated: true)
}
Step 4: Populating the Text Field
In the viewDidLoad() method of the UpdateToDoViewController class, populate the text field with the name of the record as shown below.
// MARK: -
// MARK: View Life Cycle
override func viewDidLoad() {
    super.viewDidLoad()

    if let name = record.valueForKey("name") as? String {
        textField.text = name
    }
}
Step 5: Updating the Record
In the cancel(_:) action, we pop the update view controller from the navigation controller’s navigation stack.
@IBAction func cancel(send: AnyObject) {
    navigationController?.popViewControllerAnimated(true)
}
In the save(_:) action, we first check if the text field is empty and show an alert if it is. If the text field contains a valid value, we update the record’s name attribute and pop the view controller from the navigation controller’s navigation stack.
@IBAction func save(sender: AnyObject) {
    let name = textField.text

    if let isEmpty = name?.isEmpty where isEmpty == false {
        // Update Record
        record.setValue(name, forKey: "name")

        do {
            // Save Record
            try record.managedObjectContext?.save()

            // Dismiss View Controller
            navigationController?.popViewControllerAnimated(true)

        } catch {
            let saveError = error as NSError
            print("(saveError), (saveError.userInfo)")

            // Show Alert View
            showAlertWithTitle("Warning", message: "Your to-do could not be saved.", cancelButtonTitle: "OK")
        }

    } else {
        // Show Alert View
        showAlertWithTitle("Warning", message: "Your to-do needs a name.", cancelButtonTitle: "OK")
    }
}
The implementation of showAlertWithTitle(_:message:cancelButtonTitle:) is identical to that of the AddToDoViewController class.
// MARK: -
// MARK: Helper Methods
private func showAlertWithTitle(title: String, message: String, cancelButtonTitle: String) {
    // Initialize Alert Controller
    let alertController = UIAlertController(title: title, message: message, preferredStyle: .Alert)

    // Configure Alert Controller
    alertController.addAction(UIAlertAction(title: cancelButtonTitle, style: .Default, handler: nil))

    // Present Alert Controller
    presentViewController(alertController, animated: true, completion: nil)
}
This is all it takes to update a record using Core Data. Run the application to verify that everything is working. The fetched results controller automatically detects the change and notifies its delegate, the ViewController instance. The ViewController object, on its turn, updates the table view to reflect the change. It’s that easy.
2. Updating a Record’s State
Step 1: Updating ToDoCell
When a user taps the button on the right of a ToDoCell, the item’s state needs to change. To accomplish this, we first need to update the ToDoCell class. Open ToDoCell.swift and add a typealias for a handler named ToDoCellDidTapButtonHandler. Next, declare a property, didTapButtonHandler, of type ToDoCellDidTapButtonHandler?.
import UIKit

typealias ToDoCellDidTapButtonHandler = () -> ()

class ToDoCell: UITableViewCell {

    @IBOutlet weak var nameLabel: UILabel!
    @IBOutlet weak var doneButton: UIButton!

    var didTapButtonHandler: ToDoCellDidTapButtonHandler?

    ...

}
In the class’s awakeFromNib() method, we invoke a helper method, setupView(), to setup the table view cell.
// MARK: -
// MARK: Initialization
override func awakeFromNib() {
    super.awakeFromNib()

    setupView()
}
In setupView(), we configure the doneButton object by setting images for each state of the button and adding the table view cell as a target. When the user taps the button, the table view cell is sent a message of didTapButton(_:) in which we invoke the didTapButtonHandler closure. You’ll see in a moment how convenient this pattern is. The images are included in the source files of this tutorial, which you can find on GitHub.
// MARK: -
// MARK: View Methods
private func setupView() {
    let imageNormal = UIImage(named: "button-done-normal")
    let imageSelected = UIImage(named: "button-done-selected")

    doneButton.setImage(imageNormal, forState: .Normal)
    doneButton.setImage(imageNormal, forState: .Disabled)
    doneButton.setImage(imageSelected, forState: .Selected)
    doneButton.setImage(imageSelected, forState: .Highlighted)
    doneButton.addTarget(self, action: "didTapButton:", forControlEvents: .TouchUpInside)
}
// MARK: -
// MARK: Actions
func didTapButton(sender: AnyObject) {
    if let handler = didTapButtonHandler {
        handler()
    }
}
Step 2: Updating ViewController
Thanks to the NSFetchedResultsController class and the foundation we’ve laid, we only need to update the configureCell(_:atIndexPath:) method in the ViewController class.
func configureCell(cell: ToDoCell, atIndexPath indexPath: NSIndexPath) {
    // Fetch Record
    let record = fetchedResultsController.objectAtIndexPath(indexPath)

    // Update Cell
    if let name = record.valueForKey("name") as? String {
        cell.nameLabel.text = name
    }

    if let done = record.valueForKey("done") as? Bool {
        cell.doneButton.selected = done
    }

    cell.didTapButtonHandler = {
        if let done = record.valueForKey("done") as? Bool {
            record.setValue(!done, forKey: "done")
        }
    }
}
Step 3: Saving Changes
You may be wondering why we aren’t saving the managed object context. Won’t we lose the changes we’ve made if we don’t commit the changes to the persistent store? Yes and no.
It is true that we need to write the changes of the managed object context to the backing store at some point. If we don’t, the user will lose some of its data. However, there’s no need to save the changes of a managed object context every time we make a change.
A better approach is to save the managed object context the moment the application moves to the background. We can do this in the applicationDidEnterBackground(_:) method of the UIApplicationDelegate protocol. Open AppDelegate.swift and implement applicationDidEnterBackground(_:) as shown below.
func applicationDidEnterBackground(application: UIApplication) {
    do {
        try self.managedObjectContext.save()
    } catch {
        let saveError = error as NSError
        print("(saveError), (saveError.userInfo)")
    }
}
However, this doesn’t work if the application is force quit by the user. It’s therefore a good idea to also save the managed object context when the application is terminated. The applicationWillTerminate(_:) method is another method of the UIApplicationDelegate protocol that notifies the application’s delegate when the application is about to be terminated.
func applicationWillTerminate(application: UIApplication) {
    do {
        try self.managedObjectContext.save()
    } catch {
        let saveError = error as NSError
        print("(saveError), (saveError.userInfo)")
    }
}
Note that we have duplicate code in applicationDidEnterBackground(_:) and applicationWillTerminate(_:). Let’s be smart and create a helper method to save the managed object context and call this helper method in both delegate methods.
// MARK: -
// MARK: Helper Methods
private func saveManagedObjectContext() {
    do {
        try self.managedObjectContext.save()
    } catch {
        let saveError = error as NSError
        print("(saveError), (saveError.userInfo)")
    }
}
3. Deleting Records
You’ll be surprised by how few lines it takes to delete records using the NSFetchedResultsController class. Start by implementing the tableView(_:canEditRowAtIndexPath:) method of the UITableViewDataSource protocol.
func tableView(tableView: UITableView, canEditRowAtIndexPath indexPath: NSIndexPath) -> Bool {
    return true
}
The second method of the UITableViewDataSource protocol that we need to implement is tableView(_:commitEditingStyle:forRowAtIndexPath:). In this method, we fetch the managed object the user has selected for deletion and pass it to the deleteObject(_:) method of the managed object context of the fetched results controller.
func tableView(tableView: UITableView, commitEditingStyle editingStyle: UITableViewCellEditingStyle, forRowAtIndexPath indexPath: NSIndexPath) {
    if (editingStyle == .Delete) {
        // Fetch Record
        let record = fetchedResultsController.objectAtIndexPath(indexPath) as! NSManagedObject

        // Delete Record
        managedObjectContext.deleteObject(record)
    }
}
Because we’ve already implemented the NSFetchedResultsControllerDelegate protocol, the user interface is automatically updated, animations included.
Conclusion
I hope you agree that the NSFetchedResultsController class is a very convenient member of the Core Data framework. If you understand the basics of the Core Data framework, then it’s not difficult to get up to speed with this class. I encourage you to further explore its API to find out what else it can do for you.
Source: Envato Tuts+ CodeNew feed